The Analysis of Breaking of Screws of the Natural Gas Gate Valve's Flange
When a natural gas company was inspecting and repairing the pipeline, it was found that some of the fastening screws of flanges of gate valves were broken. The gate valve is buried below ground. The pressure inside the valve is 0.4MPa; the medium is natural gas, and the strength of the screw is Grade 12.9, which is a high-impact screw. In order to know the cause of the breaking of the screw, the following inspection and analysis were conducted.
1. Inspection and analysis
1.1 Macro inspection of fractures of screws
Use acetone and ultrasonic wave to remove debris and stains on the surface of screws, and then perform a macro inspection. It was found that the screw's fracture was perpendicular to its axis, and there was no obvious plastic deformation before breaking, that is, brittle fracture.
1.2. The analysis of the chemical composition of the screw
The screws were sent for the chemical composition analysis. The test results are shown in Table 1. According to the standard provided by the manufacturer and material requirements for 35CrMoA in GB/T3077, you can see that the chemical composition of the screw's material obtained by the chemical method meets the requirements of 35CrMoA.
Table 1 The chemical composition of the screws %
| Chemical elements | ||||||
| C | Si | Mn | P | S | Cr | |
| Standardized values provided by the manufacturer | 0.35 | 0.20 | 0.83 | 0.013 | 0.019 | 1.12 |
| The test results | 0.358 | 0.17 | 0.66 | 0.023 | 0.012 | 1.00 |
| GB/T3077 35CrMoA | Between 0.32 and 0.40 | Between 0.17 and 0.37 | Between 0.40 and 0.70 | Less than and equal to 0.03 | Less than and equal to 0.035 | Between 1.0 and 1.3 |
1.3 The metallographic analysis of screws
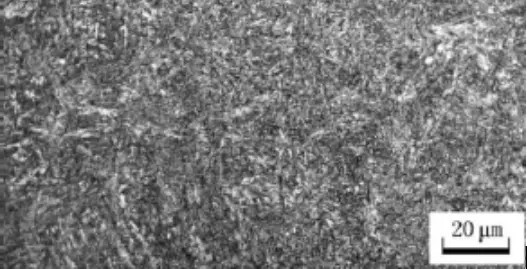
According to the analysis of the metallographic structure of the screw's material by the physical and chemical laboratory of the Hubei Metallurgical Product Quality Supervision and Inspection Station, the metallographic structure of the screw is tempered sorbite, as shown in Figure 1.

Figure 1 The metallographic structure of screws
1.4. The analysis of the microscopic morphology of the screw's fracture
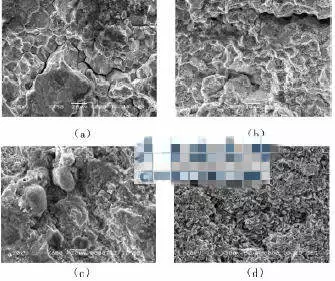
Took samples of 5 broken screws on the gate valve where the accident occurred and they were numbered 1 to 5; observed the screw's fracture using scanning electron microscopes. The micro morphology of the fracture of the No. 1 screw is shown in Figure 2. Figure 2(a), (b), (c) are the micro morphology of the edge area of the No. 1 screw. It could be seen from the figure that the micro cracks between grain boundaries were clear, which were obvious intergranular failures. The fracture of these areas was in the shape of the crystal sugar. The microscopic morphology of the central area of the No. 1 screw is shown in Figure 2(d). The toughness is very obvious, and the microstructure is very perfect, showing a chrysanthemum shape and indicating that the microstructure of the screw gradually becomes poor from the core to the outer surface. The microscopic morphologies of the fractures of the other four screws are similar to those of the No. 1 screw. There are serious intergranular cracks, multiple intergranular cracks and connected cracks.

Figure 2 The SEM morphology of the fracture of the No. 1 screw
1.5 The microscopic analysis of axis sections of screws
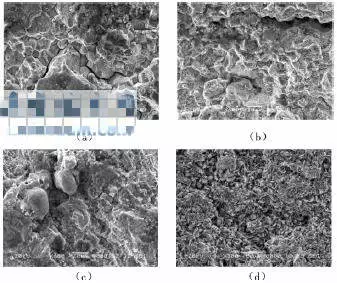
In order to study the causes of intergranular cracks in the screw's fracture, the No. 1 screw was cut along the axial section and analyzed by scanning electron microscope. As shown in Figure 3, the screw's material had serious intergranular cracking, indicating that there were defects in the material, for example, microcracks.

Figure 3 The SEM morphology of axis sections of No. 1 screws
1.6 The energy spectrum analysis of the screw's fracture
The energy spectrum analysis of the relevant points on the fractures of the above 5 broken screws was performed, and the results are shown in Table 2. From the analysis of the energy spectrum of the No. 1 and No. 2 screws, it can be seen that the micro-zone elements contain high impurities such as Si and S. Si are 3.26 and 0.74, S 0.34 and 4.40. The normal value of Si should be less than 0.30%, and S 0.035%. Ca and even Cl are measured in areas where the intergranular cracking is very serious. The segregation of sulfur, phosphorus and other elements forms inclusions, and the uneven distribution of element crystals makes the brittle of the material increase, which causes the generation of intergranular cracks. It shows that "impurity segregation" is very likely to be the cause of brittle fracture of these two screws. The analysis results of micro-zone elements of No. 4 and No. 5 screw show that the content of impurities such as Si and S is very low, while that of Cr and Mn is very high. There is no loss in the compound. Then, this fracture may be caused by "hydrogen brittlement".
Table 2 The energy spectrum analysis of the screw's fracture
| Numbered screws | |||||
| The chemical elements | 1 | 2 | 3 | 4 | 5 |
| C | 4.69 | 1.71 | 3.31 | 1.41 | 1. 14 |
| O | 23.79 | 23.67 | 30.03 | 9.57 | 10.31 |
| Al Si |
1.81 3.26 |
0.29 0.74 |
0.75 0.84 |
0.00 0.00 |
0.00 0.00 |
| S | 0.34 | 4.40 | 0.48 | 0.00 | 0.00 |
| Cl | 0.00 | 0.00 | 0.00 | 0.00 | 0.00 |
| K | 0.34 | 0.00 | 0.00 | 0.00 | 0.00 |
| Ca | 0.90 | 0.24 | 0.25 | 0.00 | 0.00 |
| Cr | 1.05 | 0.97 | 0.91 | 1.49 | 1.24 |
| Mn | 0.69 | 0.84 | 0.55 | 1.22 | 1.18 |
2. The comprehensive analysis
It could be seen that the fracture of the screw was a brittle fracture based on the above analysis, because the screw had microscopic intergranular cracks. The fracture was the brittle fracture caused by the propagation of intergranular cracks to a certain extent.
Although the analysis data of the chemical composition of the screw's material is consistent with the standard provided by the manufacturer, the energy spectrum analysis of the screw's fracture reveals that the impurity distribution in the material is uneven. The content of impurities such as silicon, sulfur, and phosphorus in some parts is relatively high, which is conducive to the formation of intergranular cracks. At the same time, through the microscopic analysis of the axis section of the screw, it can be known that there are micro-cracks inside the screw's material. The design strength of the manufacturer's screws has the highest grade. The manufacturing processes of high-impact steel screws are generally as follows: wire rods → cold drawing → spheroidizing annealing → mechanical descaling → pickling → cold drawing → cold heading → gear rolling → heat treatment. Among them, pickling and gear rolling are prone to defects. If you do not pay attention to the hydrogen removal treatment after pickling, it may cause hydrogen embrittlement of the material. Gear rolling will cause deformation of materials and may cause scratches or cracks on the surface of the thread, resulting in brittle failure of the screw. The screw is made from 35CrMnA, which has good resistance to hydrogen sulfide stress corrosion under the condition of no defects and small tensile stress. However, in the case of defects in the screw, it is necessary to study how to prevent the brittle fracture of the screw caused by the crack propagation.
3. Conclusion
Fractured screws have serious intergranular cracks, which are brittle fractures when intergranular cracks propagate and penetrate to a certain extent. The content of impurities such as silicon, sulfur, and phosphorus is relatively high in some parts of the screw's fracture, and "impurity segregation" is conducive to the formation of intergranular cracks. The manufacturer chooses high-impact screws of Grade 12.9. The manufacturing process of high-impact screws is improperly handled, and there are hydrogen residues, leading to defects like micro cracks in the screw's material. Therefore, the fracture of the screw is caused by "hydrogen embrittlement", which is also the main factor of the brittle failure of the screw.
Through calculations, the use of ordinary screws with a strength grade of 6.8 can meet the strength requirements of the gate valve during use. Meanwhile, the ordinary screws of Grade 6.8 are not subjected to pickling and other manufacturing processes, and the risk of generating microscopic cracks due to the hydrogen residue in the production of screws is reduced. It is recommended that ordinary screws of Grade 6.8 should be adopted.


