Analyzing the Distribution of Hardness of Ball Valve Core Coatings
1.1 Dimensional changes of the ball core before and after cladding
The size of the ball core changed significantly before and after cladding, the sphericity increased to 10 to 20 times that before cladding. The maximum deviation increased to 20-40 times that before cladding. However, the coating thickness of the ball core is 1000μm, and the drawing requires a coating hardness of 58 to 63HRC, corresponding to a coating thickness of about 650μm, that is, the coating grinding allowance is 350μm. In principle, when the sphericity of the core is less than 350μm, it can be ground to the size and hardness required by the drawing. Therefore, after the vacuum cladding of the ball core, when the deformation of the ball core is less than the grinding allowance of the ball core, taking the 1# ball core as an example, the grinding allowance on one side is 0.5 mm. When the sphericity is less than 0.5mm, a reasonable grinding process can be ground to obtain a qualified ball core of the valve. The grinding allowance of 1# ball core is shown in Figure 5.
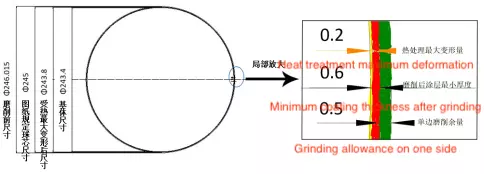
Figure 5 Schematic diagram of grinding allowance for 1# ball core
1.2 Analysis of processing time of ball core grinding
Figure 6 shows the distribution of the processing time of each positioning point of three groups of ball cores with different sizes during grinding. It can be seen in the figure that the positioning points with the longest grinding time of all ball cores are distributed on the middle circle, and the grinding time at point 2 is the longest among all positioning points. The grinding time of the 2# and 3# ball cores in the first group and the 7# ball core in the third group is higher than that of other ball cores in the same group, mainly because of the larger volume of the flow point of the ball core. In the grinding process, the highest point of the cutter head and the surface of the ball core contact first, and the flow point is the earliest to be subjected to the grinding action of the cutter head. When the core coating is vacuum cladding, the surface coating will slip, causing the overall diameter of the circle is too big, so the grinding time of the middle circle in Figure 6(a) is longer.
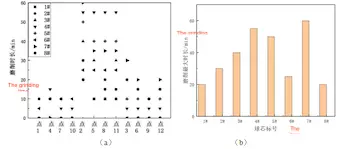
Figure 6
1.3 Analysis of the hardness of the ball core after grinding
Variance is a measure of the uniformity of a set of data. Table 4 shows the variance value of the surface coating hardness of 8 tracking ball cores. Figure 7 shows the hardness variance distribution of each ball core after grinding. Among them, the variance value of the 3# core is the greatest, and its hardness distribution is also the most uneven. From the hardness test results in Table 4, it can be seen that the hardness values near the test points in the left, right and middle circles of the 3# core are lower than 50HRC, and the hardness value at the anchor point 2 is the lowest, only 39 HRC. While other core hardness values are greater than 50HRC. The macroscopic hardness of the coating is affected by the thickness of the coating. When the hardness is lower than 50HRC, the smaller the measured value is, the smaller the coating thickness becomes.
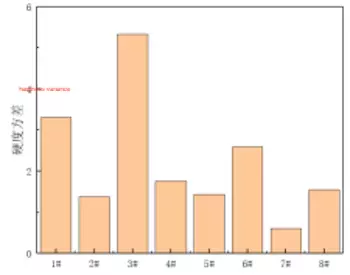
Figure 7 A comparison of core hardness variance
1.4 Analysis of the relationship between grinding time and hardness of ball cores
Figure 8(a) shows the relationship between the grinding time before correction and the variance of hardness. From the comparison results of three groups of ball cores with different sizes in the figure, it can be seen that the shorter the grinding time is, the smaller the variance of hardness becomes. However, there are some abnormal values in the table, for example, the grinding time and hardness variance of 2# and 3# in the first group and 7# in the third group cannot correspond to other test values in the same group, mainly due to the serious slippage of the coating layer, which is caused by the large volume of point 2 and the middle circle. After the three cores with abnormal grinding times were repaired according to the minimum grinding time of the same group, the results are shown in Figure 8(b). Therefore, controlling the grinding time of the ball core can ensure the uniformity of the hardness distribution of the ball core. The shorter the grinding time is, the more uniform the hardness distribution of the coating becomes.
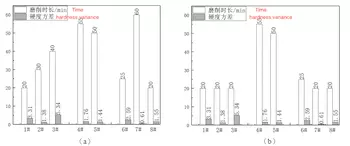
Figure 8
2. Conclusion
When the core is vacuum cladding, the surface coating of the core will slip due to gravity, and flow points will appear, which will reduce the roundness of the ball. If the roundness of the core after vacuum cladding can be guaranteed to be less than 0.5, it can be controlled by the time from the beginning of grinding to all the positioning points on the surface of the core is ground to ensure the uniformity of the coating thickness after spherical grinding.
The size of the ball core changed significantly before and after cladding, the sphericity increased to 10 to 20 times that before cladding. The maximum deviation increased to 20-40 times that before cladding. However, the coating thickness of the ball core is 1000μm, and the drawing requires a coating hardness of 58 to 63HRC, corresponding to a coating thickness of about 650μm, that is, the coating grinding allowance is 350μm. In principle, when the sphericity of the core is less than 350μm, it can be ground to the size and hardness required by the drawing. Therefore, after the vacuum cladding of the ball core, when the deformation of the ball core is less than the grinding allowance of the ball core, taking the 1# ball core as an example, the grinding allowance on one side is 0.5 mm. When the sphericity is less than 0.5mm, a reasonable grinding process can be ground to obtain a qualified ball core of the valve. The grinding allowance of 1# ball core is shown in Figure 5.

Figure 5 Schematic diagram of grinding allowance for 1# ball core
1.2 Analysis of processing time of ball core grinding
Figure 6 shows the distribution of the processing time of each positioning point of three groups of ball cores with different sizes during grinding. It can be seen in the figure that the positioning points with the longest grinding time of all ball cores are distributed on the middle circle, and the grinding time at point 2 is the longest among all positioning points. The grinding time of the 2# and 3# ball cores in the first group and the 7# ball core in the third group is higher than that of other ball cores in the same group, mainly because of the larger volume of the flow point of the ball core. In the grinding process, the highest point of the cutter head and the surface of the ball core contact first, and the flow point is the earliest to be subjected to the grinding action of the cutter head. When the core coating is vacuum cladding, the surface coating will slip, causing the overall diameter of the circle is too big, so the grinding time of the middle circle in Figure 6(a) is longer.

Figure 6
1.3 Analysis of the hardness of the ball core after grinding
Variance is a measure of the uniformity of a set of data. Table 4 shows the variance value of the surface coating hardness of 8 tracking ball cores. Figure 7 shows the hardness variance distribution of each ball core after grinding. Among them, the variance value of the 3# core is the greatest, and its hardness distribution is also the most uneven. From the hardness test results in Table 4, it can be seen that the hardness values near the test points in the left, right and middle circles of the 3# core are lower than 50HRC, and the hardness value at the anchor point 2 is the lowest, only 39 HRC. While other core hardness values are greater than 50HRC. The macroscopic hardness of the coating is affected by the thickness of the coating. When the hardness is lower than 50HRC, the smaller the measured value is, the smaller the coating thickness becomes.

Figure 7 A comparison of core hardness variance
1.4 Analysis of the relationship between grinding time and hardness of ball cores
Figure 8(a) shows the relationship between the grinding time before correction and the variance of hardness. From the comparison results of three groups of ball cores with different sizes in the figure, it can be seen that the shorter the grinding time is, the smaller the variance of hardness becomes. However, there are some abnormal values in the table, for example, the grinding time and hardness variance of 2# and 3# in the first group and 7# in the third group cannot correspond to other test values in the same group, mainly due to the serious slippage of the coating layer, which is caused by the large volume of point 2 and the middle circle. After the three cores with abnormal grinding times were repaired according to the minimum grinding time of the same group, the results are shown in Figure 8(b). Therefore, controlling the grinding time of the ball core can ensure the uniformity of the hardness distribution of the ball core. The shorter the grinding time is, the more uniform the hardness distribution of the coating becomes.

Figure 8
2. Conclusion
When the core is vacuum cladding, the surface coating of the core will slip due to gravity, and flow points will appear, which will reduce the roundness of the ball. If the roundness of the core after vacuum cladding can be guaranteed to be less than 0.5, it can be controlled by the time from the beginning of grinding to all the positioning points on the surface of the core is ground to ensure the uniformity of the coating thickness after spherical grinding.


